[ad_1]

I’m baaaaaaack. Here with part 2! I left you with a cliffhanger (aka a place to take a break) with my garage doors being installed and absolutely hating everything about them. Picking up where we left off, at this point, it’s May 8th 2021. We started this journey on April 19th 2021. Within those short few weeks, my contractor Ron and his guys got a lot finished. They ripped up the whole front yard (because every inch was covered in concrete), removed and replaced the sewage line and the water line (BORING), ripped up the fence along the left side of the driveway, ripped out the insides of the stairs and patio (all rotted), had the whole area graded away from the house, brought plumbing and electrical to the front yard (outlet and faucet to the right of the gate for eventual irrigation for the green space and an additional outlet on the patio), installed a french drain along the front of the garage, poured a new driveway and walkway to gate and stairs, built a new wall where the fence was along the left side of the driveway and a half wall in an L shape to separate the driveway from the (eventual) green space, pulled the garage out to the depth of the stairs and then (finally) the garage doors went in. Dun dun dun…

I mean, no comment necessary I guess. Maybe I should be happy that the workmanship up to this point seemed good? I shouldn’t have been too surprised though. Going even further back, in May of 2018 we had our front gate/fence ripped out and replaced:


The gate they installed in 2018 was good for like, 6 months? And then every 2 months we would have to have them come out and shave it down or move the hinges. It would constantly get stuck (one time resulting in our tenants being unable to leave the yard) or be too loose and bounce open. I’m not a door scientist but I believe the issue was that the frame of the gate was made with wood. Probbbbbably because I couldn’t afford anything else at the time and my contractor knew it so he didn’t give me an option. In 2020 at some point, my husband had had enough and got a recommendation from a friend of ours and had this new and improved gate made:

Let this be a lesson: better quality is always worth it.
Unless you’re broke and you just need a gate for 2 years while you save up.
Alas, It’s been there for 2 years and we have not had one issue. So when Ron slipped his slippery self into my life again, I was clear: the garage doors need to be just like the side gate. And I meant *like them* in that they need to be in a steel frame and also in the same style. Simple vertical wood planks, no fancy business. So now let me show you a side-by-side of what I asked for vs. what I got:


Ugh. Although I will say, the framing of the garage doors is great, it was the execution of, well, everything else. What I asked for isn’t hard so they actually seemed to go out of their way to make this as bad as it was. To me, if they had never added the border – that I did not ask for – it would have been fine. I *think* they added it because there is a steel frame on the inside of the door that follows the same lines of the border, around the outsides and through the middle. I think they thought it would be easier to attach the wood to the frame if they could drill straight through the wood into the frame and then cover their screw holes with the wood. They didn’t think through how the handles would work and were just like “F it”. I complained right away but even though they were able to do that huge list of things above in 2.5 weeks, the handles wouldn’t be remedied for MONTHS. Oh, we’ll come back to this saga. Spoiler: it gets worse before it gets better.
Back to May 8 2021…


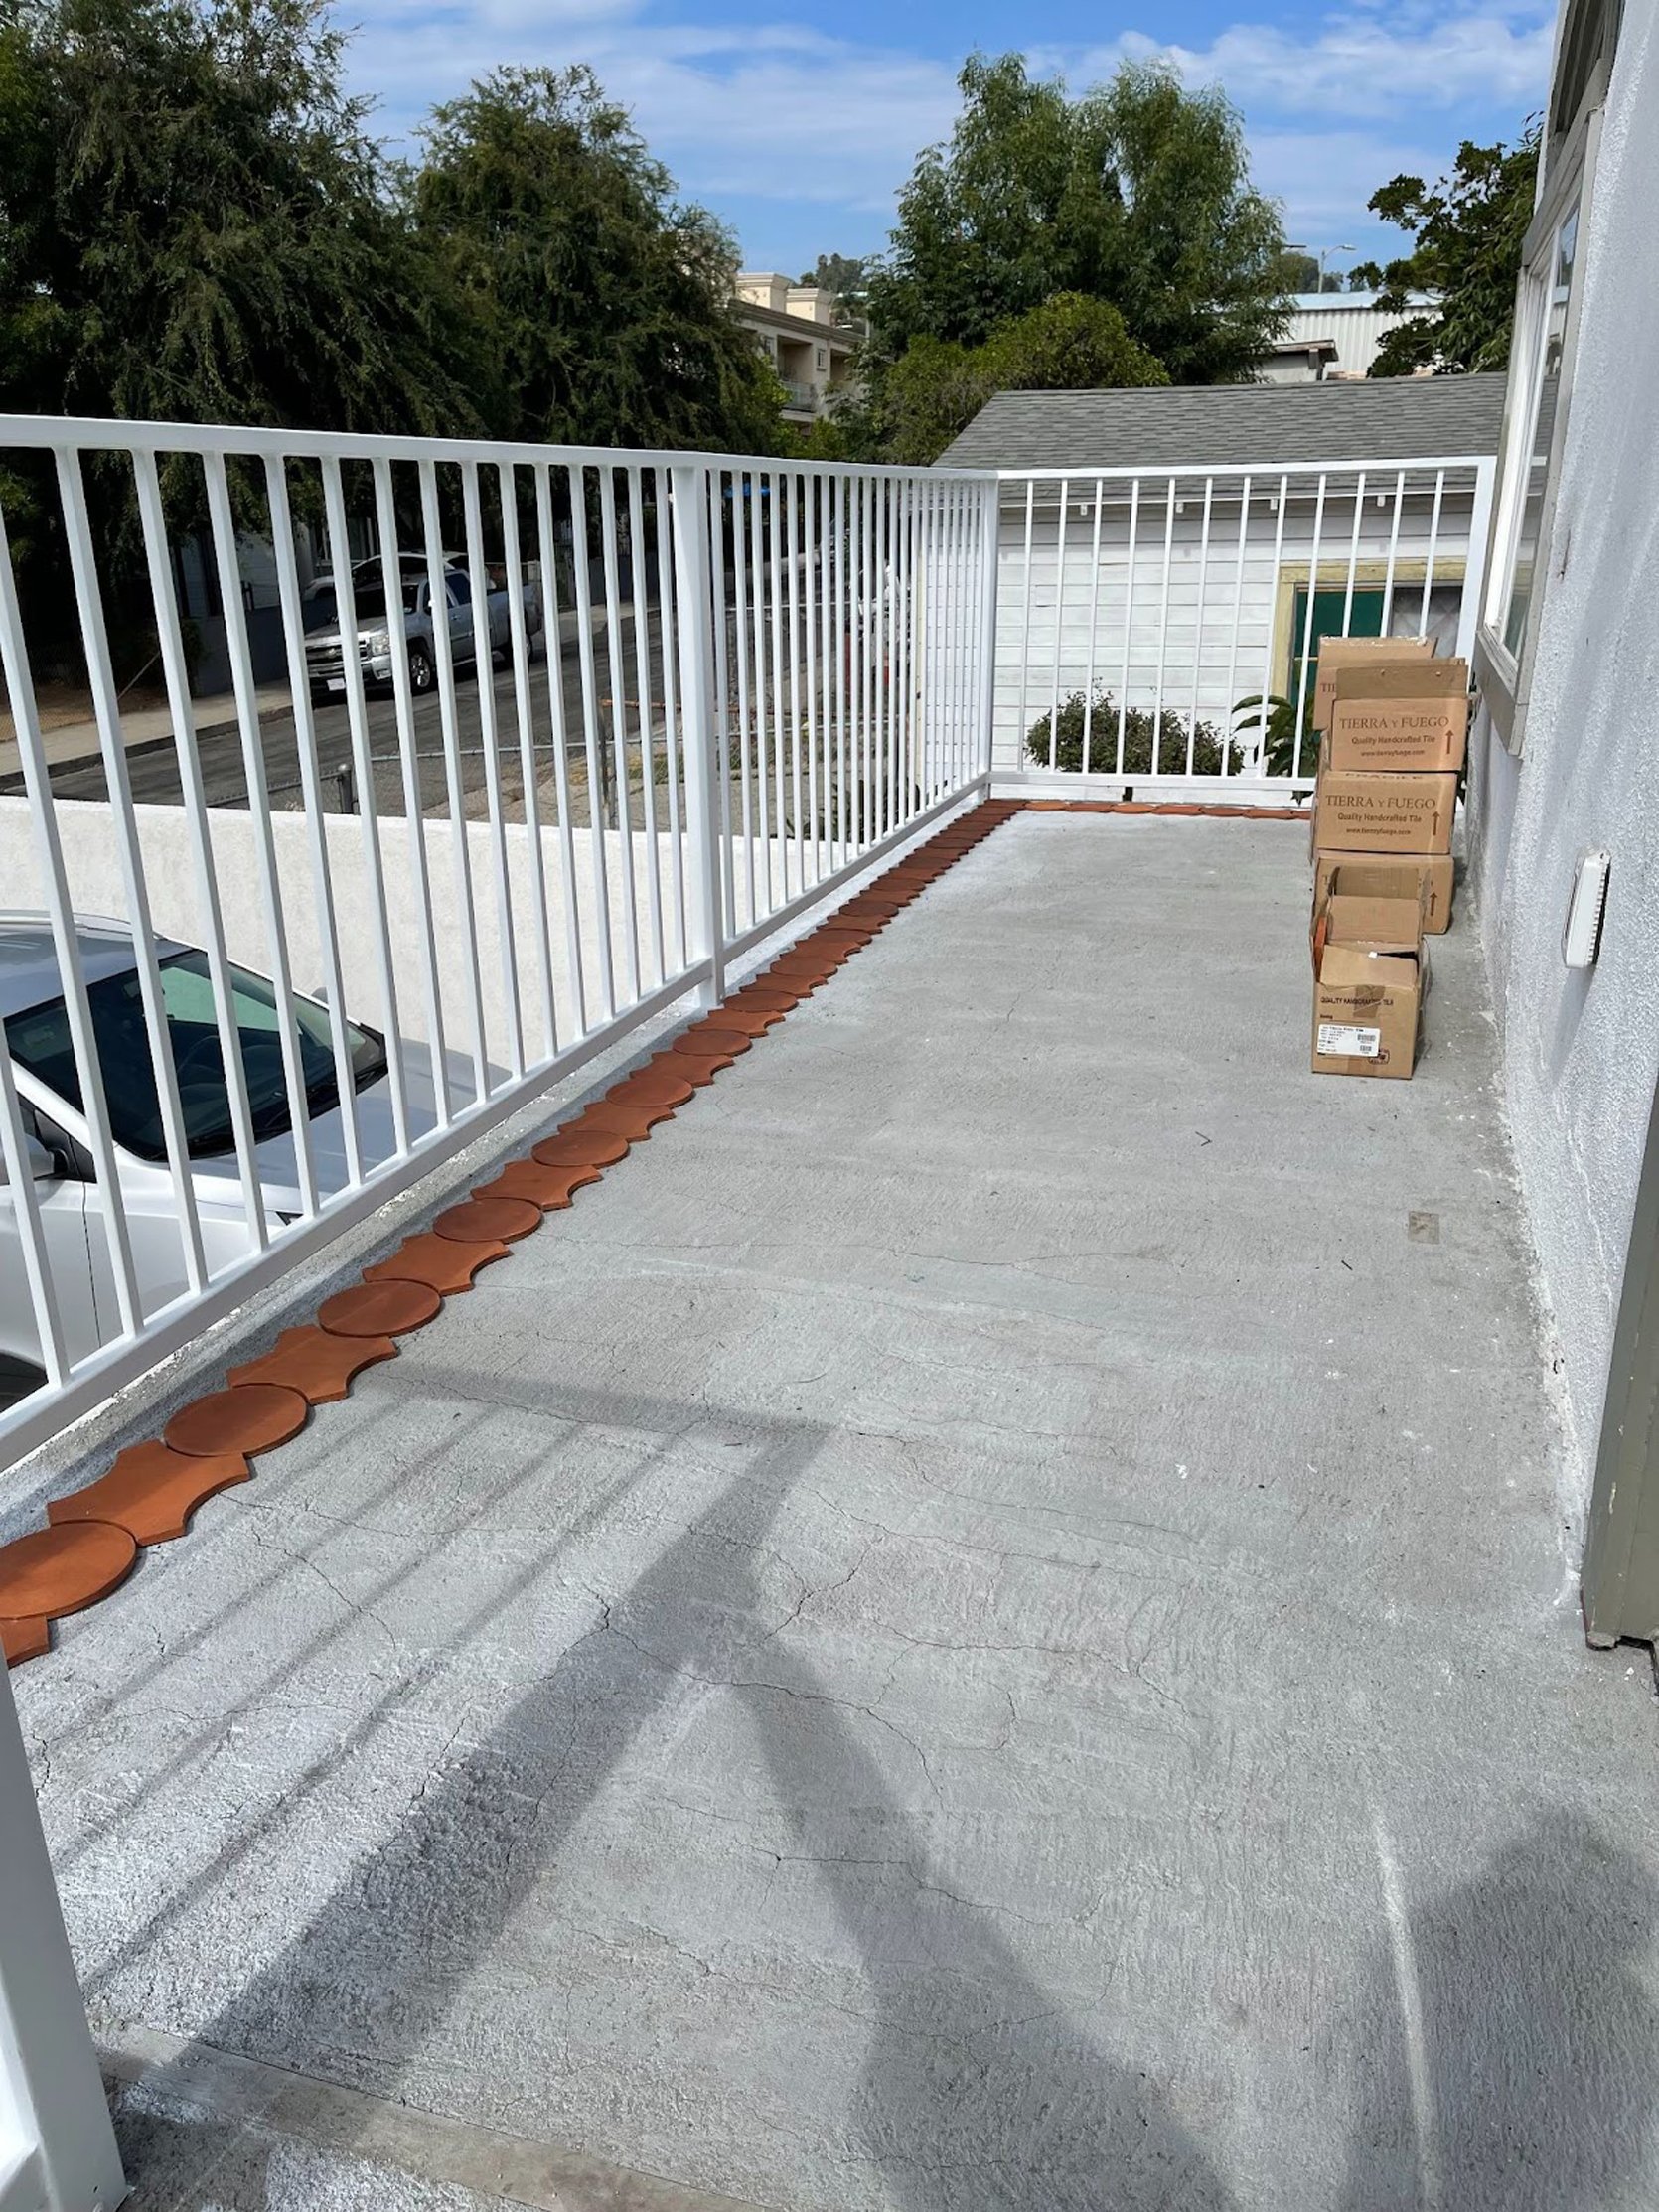
This is the patio and stairs in the process of the rotted wood being dealt with. I wish I had more pictures but I had a job and missed a bit of the demo. The garage doors used to be in line with the house, but as you can see above, they have been pulled out to the width of the stairs. Before, the patio acted as a natural cover for the right side of the garage which we found helped with the flooding in that garage and helped protect the wood on that garage door better (because the overhand was covering it). The patio, or really just a landing to put your stuff down and unlock the front door, was also very skinny, just the width of the stairs (40”). So we decided to extend the patio out 2 feet to match the line of the planter you can see here.
And unfortunately no, that jasmine plant didn’t make it through all the upheaval, although not for lack of trying. Worry not, I planted a new one.
The next phase was stucco-ing the concrete walls, seen here:

And framing out the stairs and patio:

Photo out our front door:

Where we were in mid May 2021:

This process was painstakingly slow. The framing happened in mid-May. The first week of June they stucco-d, put in the bases of the railing, and waterproofed.

First week of June:


I was out of town for a huge chunk of June/July visiting both of our families that we hadn’t seen in literal years. Probably why they didn’t feel a rush to get things done. It’s now July 12th. While we were gone they came by to “fix” garage gate 2021…y’all. Y’ALLLL. You’re going to die:

I l.i.t.e.r.a.l.l.y. thought I was being punked. HARK! They even reinforced the border I said I hated and wanted removed. All I did was text Ron that exact photo with zero explanation. Apparently, he came by the next day to look at it. More on that later…
Once we were back in town they installed a simple railing which I chose using this super-secret insider design tip: Legal, Least Offensive, and Cheapest.

Next, I started thinking about tile. I had a good amount of leftover tile from our back patio and made my husband pull it all out with me so I could see how much more we would have to order to do this space as well. For all you wondering, yes, we tiled the back patio. Last I checked in with you we had painted it temporarily until we could save up for the tile I wanted. No, there’s no formal reveal yet but you peep it on this Halloween post from last year, OR I’ll save you the extra click and you can see it on this BTS from that shoot:

The chaos represents my life. The tile is pretty though 🙂

The waterproofing burned off in the hot hot summer heat, which is why it is no longer red in these photos, and they had to reapply. But back to the tile for a second because I know people want the down and dirty on it. It is the Cross 2 and Circle by Tierra y Fuego. It’s gorgeous and handcrafted. It is not cheap and it was not free. The cost to do both spaces was a little over $5,000 and if you include custom sanded grout, probably around $5,500. I drove to San Diego to pick it up because it saved me a bit on shipping. It was an easy process and they are a lovely small company. The tiling cost was included in the $60,000 budget for this space and when we talk back yard I’ll pull up the info on the labor and we’ll visit all of this again.

*insert big sigh here* We’re at the place in the story when I realize both how arduous and long this was (and still is. Spoiler alert: it’s been a year and we aren’t done folks!) and also feeling pretty proud that we have really scraped this ish together. We are both freelancers, we never know where money is going to come from or if it will come and every time we do something like this it’s a huge leap of faith that jobs will come from somewhere to pay for it and for our very expensive Los Angeles life. However, it’s also why sometimes these things get stretched out. Ron “fixed” the garage doors (we’ll call it good enough), I’ll save the close-up for Instastories today because I only have video of it, but you can see a little in this pulled-back photo. All Ron needed to finish what we had paid for was the tile and we simply couldn’t afford to buy the materials. Delta hit and so did our work. My husband lost a job he was supposed to be on for a month a couple of days before it was supposed to start, and production for me came to a screeching halt as companies tried to adapt to what the new variant meant for business.
We had spent $60,000 and our house was still kind of, well, depressing. Don’t get me wrong, Andrew was enjoying a little extra breathing room in our garage and it was nice to know that scary things (like an exploding sewage line) were taken care of, but we didn’t really want to be out there. For some reason having a big dirt patch screams to people “DUMP YOUR SH*T HERE” and we were constantly dealing with other people’s trash in our yard. It was uninspired, to say the least.
Summer turned into fall and the house remained the same. I remember one day, after another person had dumped their trash in our yard, I had a surge of energy to try to make the space the best it could be and to stop wallowing that it wasn’t “done”.
We spent a weekend removing the huge chunks of concrete and some leftover construction junk from the eventual green space and it’s funny, as soon as we did that people stopped dumping. It’s the Disneyland idea I guess: if you keep it clean, people won’t throw their trash on the ground. Even though the patio was a weird pinkish hue from the waterproofing wearing off, I put two of our CleverMade Tamarak chairs onto the patio and started enjoying the space for what it was, not what it would be. Not unlike when our backyard was dirt for 6 months because we couldn’t afford landscaping yet.
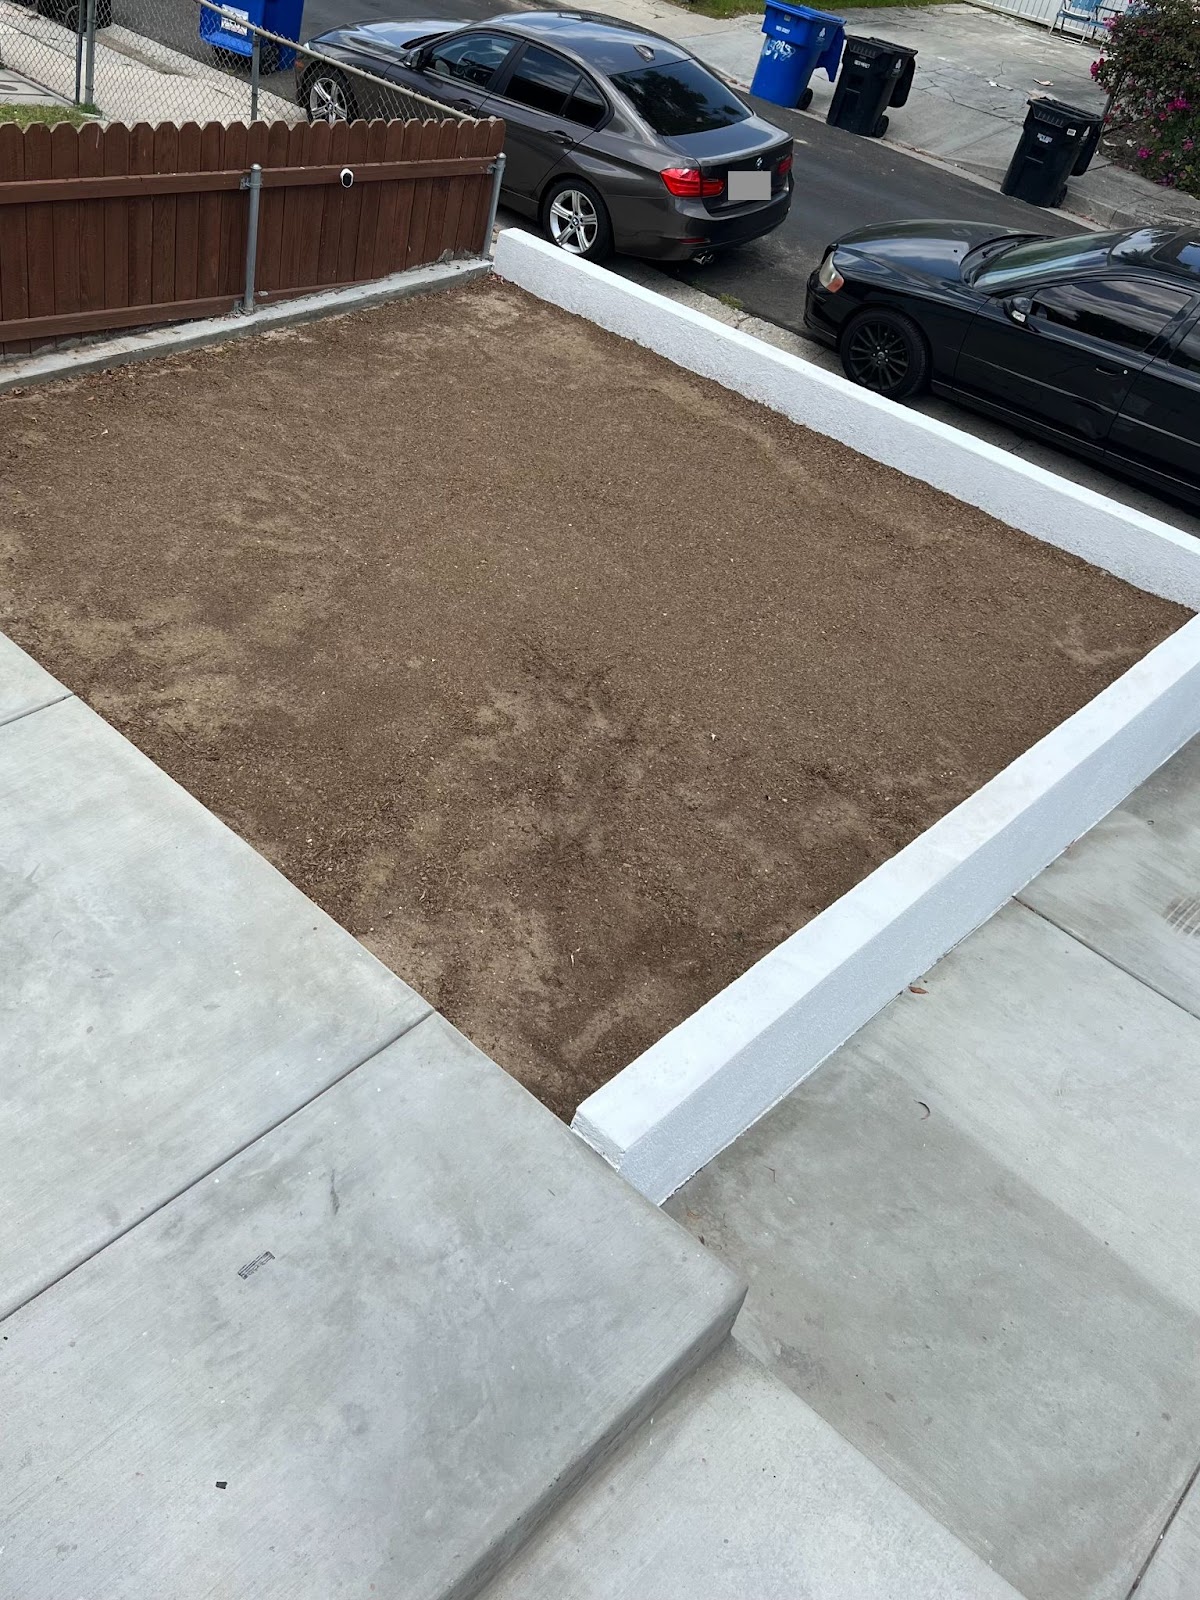
During this time is when I started thinking about what I wanted from the 16’x16’ tiny plot of dirt down by the driveway. I had finally hopped to it and started harvesting from our orange tree out back and leaving a crate of oranges with Target bags (from our many Target shoots in 2021) for the neighbors to take when they walked by. Andrew and I both really enjoyed how excited people would get (especially kids) and how fast they would go. There are only so many oranges we can eat and we were happy to share.

I decided that between the backyard and the front patio, we really didn’t need any more hanging-out spots. I *may* have briefly considered hedging the thing in and putting a hot tub out there but alas, that sounds expensive (and a little weird?). We could just landscape it and make it pretty, but why not make it pretty AND edible? Maybe I was still inspired by the Ron Finley Masterclass I devoured in the summer of 2020 about the importance and reality of urban gardening. I mentioned in my backyard post that I thought maybe we can fit a small raised garden on the side of the back patio, but now sitting on the front patio looking down, I realized it made way more sense to put it out here and go bigger. The back patio would be better suited for more hanging out space (or mayyyybe a wood fired hot tub HIIII Goodland, slide into my DMs please).
This is a lesson that sometimes taking your time on a renovation can help you make more thought-out decisions. That’s my reframe of this YEAR PLUS journey anyway. I’ll come back to the urban gardening thought. Let’s get back on chronological track…

Around October 2021 I started to get concerned about our rainy season. The patio was meant to have tile on it so it wasn’t weather-appropriate as is. Yes, I know, it’s absolutely nuts that we started this journey in April 2021 and at this point we are in October 2021 and it. Had. Not. Rained. Isn’t that wild? 13 years in Los Angeles and it still surprises me. October 25th 2021 came the first real rain. Why do I know the exact date, well, wouldn’t you know, MY GARAGE FLOODED.
Are
You
F*cking
Kidding
Me.
I think I went catatonic and didn’t speak or feel things for days. The drain that ran from the left side of my house to the street failed. Greatly. The water built up on the back side of the wall because the drain was not big enough to handle the water that we have learned, funnels from both of our neighbors directly into our yard. It was over 3 feet deep and needed to go somewhere. Water finds a way. It finds a way. I went into my side of the garage (left) and it sounded like a faucet was running. It found a crack and pushed its way through the side of the house, something that had not happened before. It’s hard to see water in photos, but we’ll post some videos on Insta-stories.
*insert even deeper sigh here* We dried out the garage, luckily it didn’t last longer than a day, and patched the side of the house:

After it flooded AGAIN AND WORSE a couple of months later, we drilled a couple of ugly holes in the wall itself so the water could go down the drain and through the holes. It’s not pretty but it gets the job done. Yep, not sure how to reframe that one. Luckily my side of the garage has seen a lot of flooding so everything is in bins but Andrew’s side is NOT so, yeah, that was super fun.
In January of 2022 (yes we are finally in 2022 at this point in the story) we pulled the trigger on buying the tiles and I had done a bit of research and decided we should invest in painting our home with Tex-Cote paint. We had painted when we moved in in January of 2017 and we had major issues with cracking on both houses. Apparently, most houses need to be painted every 5-7 years anyway (I had no idea) but we had patched and painted the house a number of times and the cracks just kept coming. I started looking into it because the paint job from just a few months prior was already having issues of chipping and cracking. Tex-Cote is supposed to help with that, along with the apparently proven claim that it saves energy and reduces cooling costs. If that’s true, it would be great since our back house is black and pretty much a sun magnet. I was most taken with the idea that I would never need to paint my house again and the lifetime guarantee that if we did have a problem they would come out and fix it free of charge. We used CAT Exteriors and had a good experience. It was $22,000 (both houses plus all exterior stucco walls) and they have financing options, which we are doing, obvs. We actually don’t even start paying on it until November 2022. The original plan was to pay it off when we refinance. With interest rates going up, it may not be worth it since the interest rate on it is 5.99%. We’ll see where mortgage rates land when we are ready. Side note: our mortgage rate is ok, but we pay mortgage insurance because of how little we put down, which is the main reason we would refinance. You can read about all our boring mortgage stuff here if buying a house for only $22,000 down interests you (get it?).
So next I picked up the aforementioned tile and the custom grout was delivered in early February, nearly 10 months after we started this journey. Tiling started right away…


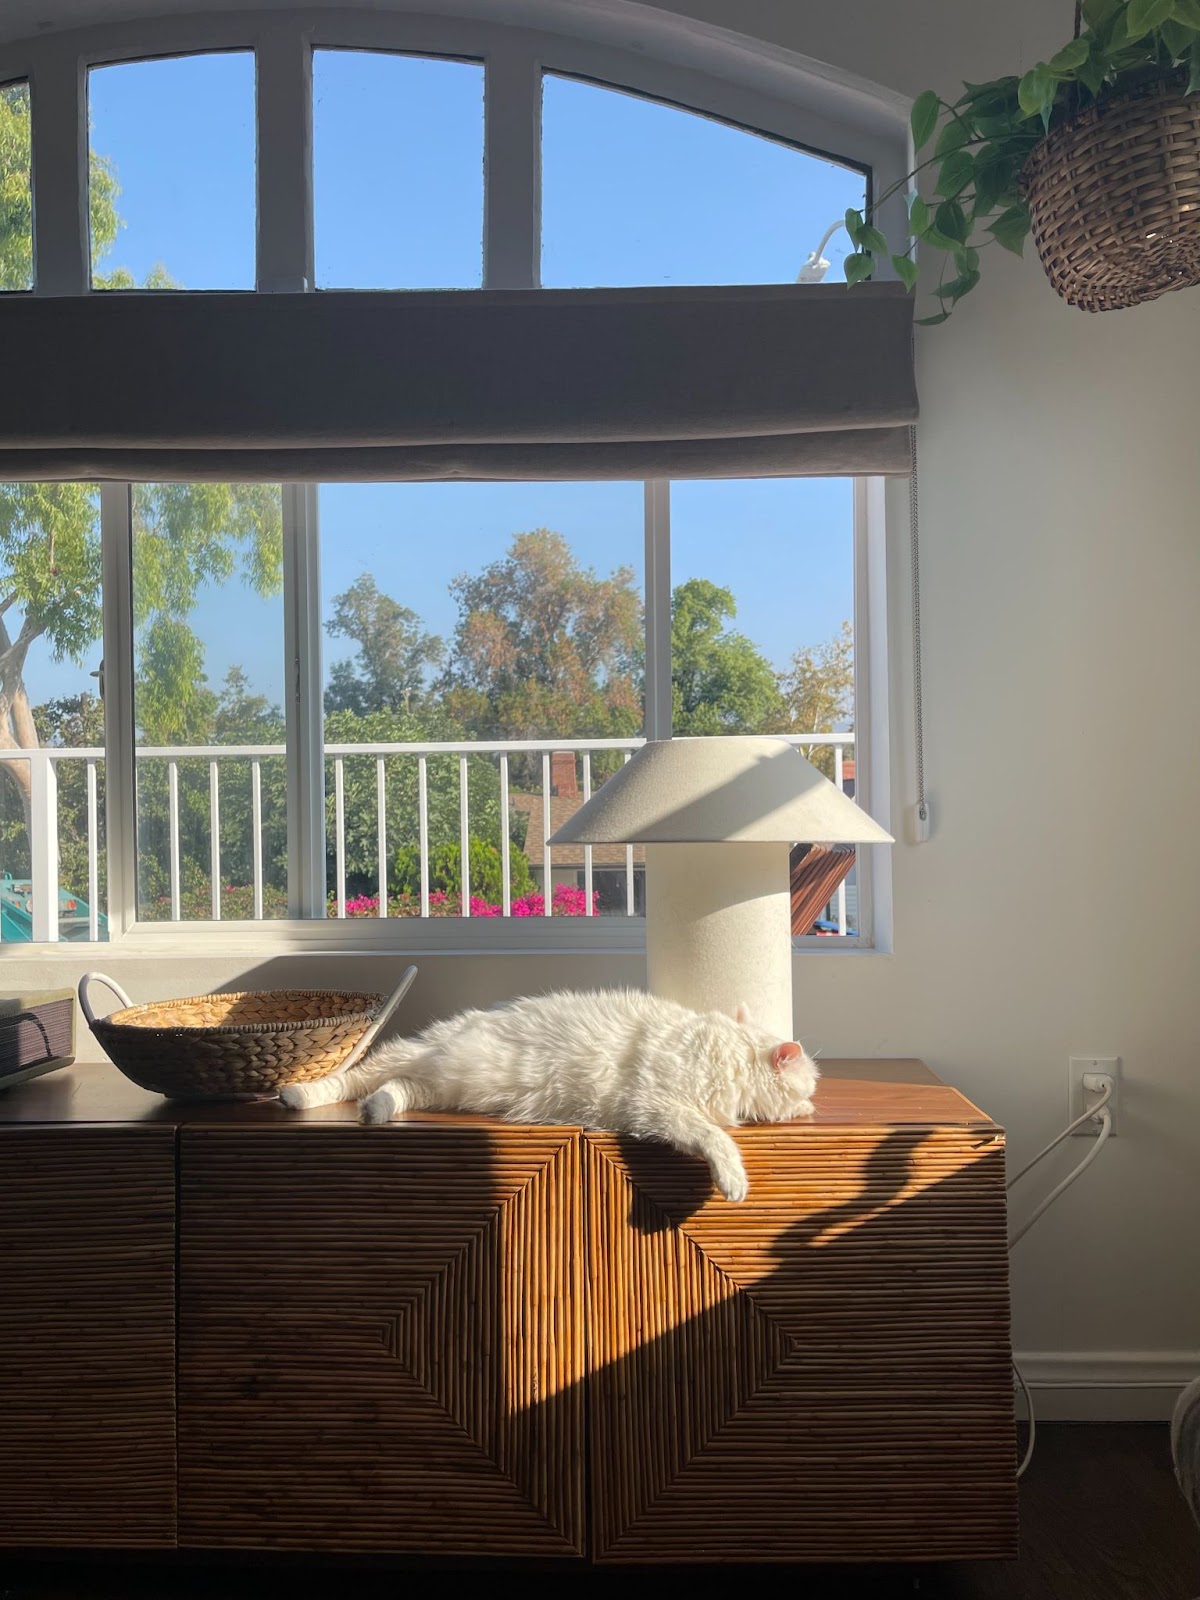
Yes, the railing does come into our window view, unfortunately. “Safety” and “codes” ya know?? My hope and prayer is that the new jasmine plant wants to live as much as the last one and climbs all over the railing eventually. This is the main reason why I didn’t care too much about the style of the railing, I’m hoping it gets more or less completely covered in the next couple of years. You will notice this is where we said goodbye to our old jasmine plant. It had some damage from all the construction, my landscape guy said it was probably because some of the branches were bent when at different times it had to be pulled away from the house. Also, I wanted the painters to be able to get this spot easily.
Unfortunately, I had a death in the family and flew to Maryland last minute to be with loved ones, so I completely missed the paint transformation. Andrew had to stay behind to oversee all of that because it was quite a production. The prep to the finished product can take about a month (hence the price tag). I’m not educated on it enough to give you a full lesson on how Tex-Cote works but I do know it requires an intense blasting of your house to expose (and worsen) any cracks, so they can get in there and deeply repair the weaknesses. Then there are multiple layers of product to paint on, and the end result (if you could look at it apart from the house) is a thick, malleable substance. It’s as if you took 10 layers of gaff tape and stuck them to each other. The bendable quality is what allows the house to move a little without causing cracks. Only the last layer is the color of your house.


The “after” of the paint probably isn’t going to look as amazing as it feels because we didn’t do anything drastic but believe me, it’s so much better. Cracks are gone and everything looks so smooth. Another great thing about the paint that I’ve learned is that it is WAY easier to clean. For example, if a bird poops down the side of your white house, you just have to spray it with a hose. Ready for the “afters”?

Tile! At last! Just a little sneaky peek before the furniture and plants are added. I hope to add a tall planter on the far end with plants that create a privacy wall so it doesn’t feel like we’re trying to look over our neighbor’s fence and into their yard. It’s a slim space, from the house to the inside of the railing is only 5 feet wide but the whole space is 17 feet long. It’s been a challenge to figure out furniture for sure, but we’ll come back to that at a later date.
She’s still a sillylooking girl, but she’s mine. The crack that just would not give up, where the new wall on the right (gate side) connects with the house, is gone and has not come back. All of my doors open and close and lock with ease. I don’t worry every time I flush my toilet. The garage is yet to flood again (still suspicious) and we have a lovely patio on which to watch the sunset. It’s hard to tell from this angle but there is a gate that closes at the top of the steps that we just need to add something to so Daffy can’t walk right through. When we do, we can sit out here with her and not worry about her wandering off. Puck does whatever he wants and would jump right over it but Daffy, not so much. She’s can’t do such dextrous things.
This is a good place to pause. I thought I would get to the garden but that actually doesn’t happen for a couple of months (and is still in process). So up next: we will talk about my 16’x16’ box, what I plan to do to cover the backside of my neighbor’s fence, how my newly planted jasmine is doing, a cheaper way to do irrigation, what it’s like to shovel literal TONS of gravel in 100-degree heat, and lots and lots of garden goodness with Eden of Down to Farm.
I’ll leave you with this photo of the box right after we had soil added and did some boring drainage stuff that we’ll talk about next time.
To be continued…
The post All The Ups And Downs Of Emily Bowser’s Front Yard Renovation (Part 2!) appeared first on Emily Henderson.
[ad_2]
Source link